How To Replace A Storefront Door Lock
In this guide we explain how to replace any kind of lock on your commercial storefront door.
Step 1: Identify The Type Of Lock Needed
Types Of Storefront Door Locks
In order to replace an existing storefront door lock you must first determine what type of storefront door lock is on your door. There are three main lock types used on storefront doors: deadlock, hookbolt, and deadlatch. Each lock uses the same size lock body housing designed to be mortised into any storefront door. Hook bolts are only used on sliding storefront doors such as automatic sliding doors. If the door is a storefront door that swings, then most likely the lock type is either a deadlock or deadlatch. For help understanding the differences between these locks or identifying them, please refer to our guide "types of storefront door locks."
Step 2: Remove Old Lock
On the lock stile of the door, the main lock body will be mortised within the rail and attached by two screws. In order, to remove the old lock, you must first remove the faceplate. This can be achieved by removing the 3 faceplate screws.
![]()
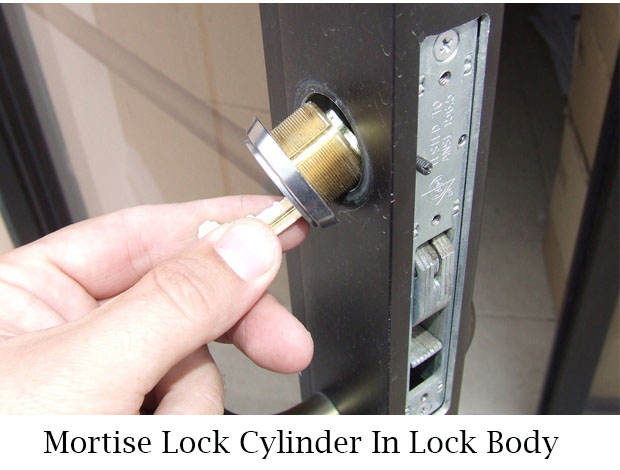
Once the faceplate is removed, the lock cylinders must be removed before the lock body can be detached from the door. To do this, there are two black set screws at the top of the lock body. These set screws press against the mortise lock cylinders. Loosen the set screws up, but do not take them all the way out. When loosened far enough, the mortise lock cylinders can be unscrewed from the lock body.
![]()
Step 3: Install New Lock Body
Place the new mortise lock body into the lock stile. Screw in the top and bottom screw so the lock body is attached to the lock stile.
![]()
Step 4: Install Outside Mortise Lock Cylinder
Make sure the two black set screws at the top of the lock body are loosened so that the new or original outside mortise lock cylinder can be screwed in.
![]()
Note that mortise lock cylinders have a cavity or channel that runs along the side of the lock cylinder threads. This channel is where the black set screw fastens against so that the lock cylinder cannot be unscrewed from an intruder.
![]()
We recommend screwing in the outside mortise lock cylinder into the lock body. Slowly screw in the black set screw while also rotating the lock cylinder gently, until you can feel that the set screw is in the channel. Once the set screw is in the lock cylinder channel fasten the set screw down tightly. Repeat this process for the inside mortise lock cylinder.
![]()
Step 5: Test The Lock
Test the outside lock cylinder and inside lock cylinder confirming that the deadlock is operating smoothly and properly. The lock bolt should engage with ease when the key is turned in the lock cylinder. If it takes alot of force, then the mortise lock cylinders may be screwed into the lock body to tight. Try loosening the set screw and loosening the mortise lock cylinder a quarter rotation. Then retighten set screw and try again.
Step 6: Install Face Plate
Once the storefront door lock is fully functional and operating properly install the face plate onto the lock body. Check the lock again to make sure it is operating smoothly with the face plate installed. Be sure the lock bolt does not hit the face plate. In some rare cases, the lock faceplate hole may need to be filed down so that the lock bolt does not hit it when engaged.
Conclusion
Use this guide to replace any storefront door lock. If you are in need of a new replacement storefront door lock we recommend Tahoma storefront door locks. Tahoma manufactures the largest selection of storefront door hardware and is trusted by building owners across America. Or if you are in need of completely new storefront doors we recommend Comanche storefront doors. Comanche storefront doors are manufactured in the USA and provide a secure and heavy duty entrance to any commercial building.
![]()
![]()
DISCLAIMER:INFORMATION PROVIDED THROUGH THIS SITE IS PROVIDED TO YOU AS IS WITHOUT ANY EXPRESS REPRESENTATIONS OR WARRANTIES OF ANY KIND, AND WE MAKE NO REPRESENTATION OR WARRANTY THAT THIS SITE (OR ANY INFORMATION PROVIDED IN RESPONSE TO YOUR INQUIRY), WILL BE ACCURATE, COMPLETE, OR ERROR-FREE.YOU AGREE THAT YOU MUST EVALUATE ALL INFORMATION AND RESPONSES, AND THAT YOU BEAR ALL RISKS ASSOCIATED WITH, THE USE OF THIS SITE, INCLUDING ANY RELIANCE ON THE ACCURACY,COMPLETENESS, OR USEFULNESS OF ANY INFORMATION OR MATERIALS MADE AVAILABLE THROUGH THIS SITE.


